Saturday, December 22, 2012

Super Easy Oreo Mint Bark


My kids call it "That Mint Oreo Stuff" but it most resembles a bark candy...
You can call it whatever you like. I call it gone!

Super Easy Oreo Mint Bark
Makes about 50 Pieces

2 Bags Vanilla Candy Wafers Separated (different colors)
2 Sleeves/Rows Oreos
1/8 t Mint Extract

Prepare a cookie sheet by covering with parchment paper or heavy duty aluminum foil.
Place Oreos in a gallon zip-lock bag and crush them.
Melt wafers according to direction (microwave or double boiler) – keeping colors/bags separate.
Stir mint extract into color that will be your base.
Carefully spread mint chocolate over the prepared cookie sheet.
Cover with crushed Oreos, pressing them lightly into the base layer.
Drizzle/spread the other batch of melted wafers over the top.
Refrigerate until hard then ‘crack’ into bite size pieces.
Can be kept in the refrigerator or freezer for up to 6 weeks (but only if well hidden in the back).

Thursday, December 20, 2012

Why....


I don’t want to talk about it. Can’t I just write about Christmas? Or the end of the world? I had some really witty lines about being out of time and the holiday to-do lists that the zombies would find. I don’t want to talk about it, but I know that I have to… This week writing about anything other than the Sandy Hook Massacre would be disrespectful.
Right now everyone knows. On Friday December 14th, 2012 Adam Lanza shot and killed his mother then drove to an elementary school and took 26 more lives, most of them less than 8 years old. What everyone doesn’t know is why. The last life he took was his own. We can’t even ask him.
It is instinct in times like this to hold our children more tightly and remind them that they are loved. We stop, listen and interact with them on a level a bit deeper than we did the day before. We soften the message with hugs and kisses, but what we are telling them is that if they were gone tomorrow, the hole left behind would be unimaginable.
My children include a two year old deep in the stage of “Why?” She asks the question incessantly. “Why?” is daddy going to work. “Why?” can’t she have another cookie. “Why?” does she have to let the kitten go when she is holding her upside down by paw and tail. Each explanation is met with a follow up question; another round of “why?”
This week I have realized how much she reflects us in the face of tragedy.  “Why did he do it?” “Why didn’t someone see the signs?” “Why did he have access to so much weaponry?” “Why hasn’t he/we/them/us/they/you/she/me done something to prevent things like this?” Each attempt at an answer brings forward another round of “why?”
We try our best to answer the questions. “Why?” is so simple yet to answer it honestly the explanation must be complex; sometimes so complex we cannot fully comprehend. We grab for any explanation that makes sense. How do you comprehend the incomprehensible?
My daughter’s incessant questioning only ceases when she reaches an answer that suits her. Here too she a reflection of us. We settle on explanations that fit our world view: gun control, mental health care, school security, parenting, religion, video games, the list goes on. No matter how woefully incomplete our personal explanations may be, we hold tight to them. Action can only happen when we have an explanation and we need to take action now.
I hope that we can and will take meaningful action to prevent anything like this happening again, but in order to do so we must come to some agreement on the causes. I don’t know the answer, but I do know that if we stop the conversation with an authoritarian “Because” we will never get there. We must stop, listen and interact with each other on a level a bit deeper than we did the day before this tragedy. To do anything other would be disrespectful.
I hope that this letter has found you and yours in good spirits and good health. Until I write again…

Saturday, December 8, 2012

Decorating Gift Bags with DIY Foam Stamps


Decorating Gift Bags with DIY Foam Stamps
 
I love this project because it is great for a wide range of ages. The samples shown were done by the elementary school kids I work with.
 
We used:
Paper bags (mine had handles but not required)
Foam sheets (any color - scraps are fine)
Chipboard (aka cereal box cardboard)
Paint
Paintbrushes
Glue sticks
Scissors
 
How we made the stamps:
Cut out foam shapes
Most everyone used a lot of little pieces to make their image
Glued them to the chipboard to make a design
Some kids tried to make words. This is harder than it looks because the words and the letters have to be backwards!
 
How we printed the bags:
We used paint brushes to put paint onto the foam so we could use different colors at the same time
Pressed them onto our bags, then lifted carefully
Did it again and again
Let them dry
Printed the other side
 
If we do it again we will:
Have lots of big paper to print matching wrapping paper
Have feathers and glitter and buttons and other fun stuff to add after they are dry
Plan different designs together & share our stamps


Monday, December 3, 2012

The Pigeon Wants to be a Puppet - Toddler Art Project


The Pigeon Wants to be a Puppet

Age: 18 Months - 5 Years (younger ones need more supervision)

Time: 10 min (+ Prep)

Theme: Mo Willem’s Character Pigeon

Books: Don’t Let the Pigeon Driver the Bus, Pigeon Wants a Puppy, or any Mo Willem’s book starring Pigeon

Materials:
Construction Paper (Light blue, Orange, Black & White)
Craft (popsicle) sticks
Glue Sticks
Adults get to use Scissors

 Prep: Cut out Pigeon heads from the light blue paper, a nickel sized white circle and a dime sized black circle for the eye, a ‘W’ shape for the beak and a small rectangle for the collar (see picture). By folding a full sheet in quarters like an M you should be able to make 8 heads per sheet. Cut with the fold at the top.

Activity: Each child gets a craft stick, a head, eye pieces, beak, collar and a glue stick. To assemble, put glue all over the ‘inside’ of his head then fold over the stick. Glue on the big circle then the little one for the eye, then add the beak and the collar. Hide the hot dogs and the keys – you have your own pigeon!

Notes/Tips: Ask older kids what they think the pigeon should or should not be able to do and why. Encourage them to act it out with their Pigeon.
Having the pieces twofold so they wrap around the stick isn’t essential, but it makes them more durable for play.


Sunday, December 2, 2012

Morning Glory Seeds

 
To spite poor conditions and neglect, from mid summer into fall our back fence is graced with pink, blue and purple morning glories. It is December now. The last blossoms are gone. Hanging from the vines are paper thin orbs backed by crisp stars; gracefully wrapped packages of potential waiting for spring. Sleeping beauties...

Sunday, November 25, 2012

December Tis the Season to Send, Send, Send!

This year I've had a personal goal of sending out at least two pieces of snail mail a week. Letter writing is a art that is rapidly falling to the wayside and this is my own humble effort to keep the tradition alive. Most of what I send hasn't been letters at all. I've sent mostly cards and art made by the kids or myself. Still I have fallen behind on my goal. Thankfully the holiday offer fabulous momentum to send, send, send!
 
Here is a sneak peak at what will be going out in December:
 
Stationery card
View the entire collection of cards.

Saturday, November 24, 2012

Grandma's Cider Pie

 
Cider pie is one of my favorite fall treats. It was one of the pies that my Grandmother would make in the fall when we had fresh cider. It was such a staple of my childhood that when I reached adulthood I was surprised at how few people had tasted or even heard of it. It is very easy to make - and if you substitute margarine for butter in the crust, it can even be vegan.
My cousin posted our Grandmother's recipe HERE. I change it up a little by using less sugar (a scant cup) and adding a dash of powdered ginger. If you are one of those people who is super impatient about stirring (guilty), you can cheat and add the cornstarch mixed with a half cup of cold cider into the rest of the ingredients as they simmer, constantly stirring as it thickens and clears. You can also fancy it up by adding a dollop of whipped cream on top.
Enjoy!

Tuesday, November 20, 2012

Pizza Party - Toddler Art Project


Pizza Party – Toddler Art Project

Age: 18 Months - 5 Years (younger ones need more supervision)

Time: 10 min (+ Prep)

Theme: Pizza

Books: Pizza at Sally’s by Monica Wellington, Pete’s a Pizza by William Steig

Materials:
Brown Construction paper (heavy weight works best)
Assorted scraps and colors of construction paper & tissue paper
Yarn scraps, fabric scraps, foam bits, packing peanuts, sequins, buttons, etc
Small paper plates (optional - for ‘serving’)
Glue
Adults (& some kids) get to use Scissors

Prep: Cut pizza crusts from brown construction paper. I cut three triangular slices per sheet, but you can also make Sicilian style rectangles, or personal pan circles. Prepare toppings such as red and orange tissue scrap sauce, yarn cheese, green pepper paper slices, packing peanut sausage, etc.

Activity: Each child gets a ‘crust’, glue, a paper plate and an assortment of toppings. Make a custom slice! You can suggest that sauce and cheese be the first two toppings, but there is no wrong way to top a pizza. Serve paper pizza on paper plates.

Notes/Tips: You can use a hole punch to ‘pit’ black olive circles and onion rings shape themselves when card stock is cut in a thin spiral. When choosing toppings avoid potential choking hazards such as buttons for little ones. This activity can be made longer by making it a pizza shop game where children make and serve slices to order.

Sunday, November 4, 2012

What Sandy Left Behind


After the Hurricane
 
Surreal. I am not sure if there is a better word to describe it.

A week ago we were preparing for a hurricane. It was a halfhearted effort as we danced back and forth across the line between preparedness and hype. For as long as I have lived here severe weather events could be described by words like: inconvenient, uncomfortable, or an adventure (like sleeping in the back yard as a kid was an adventure). The danger aspect of storms was isolated and short lived (unless someone acted stupid – and there are always a few who do). It wasn’t that New Yorkers didn’t think it could happen here, as my Companion pointed out; it is just that it never had…

Then, under the light of the full moon, in came Sandy with the tide…

Even after the worst storms things are back to a relative normal here in a few days… Call it denial, willful ignorance, arrogance: call it whatever you want but most people here really expected Sandy to be the same - Even after it hit… Even after the lights went out… Even when they woke the next day and looked around… Even after they saw the pictures on TV…  But here it is almost a week later and things aren’t back to normal… Normal will sooner be redefined…

We – my family and I - are blessed to be in a place that has been relatively unaffected. It has been inconvenient, uncomfortable, a bit of an adventure but nothing perilous. But the other three sides of our block and a lot of other patches in our neighborhood are still without power. A mile south of us, flooded basements are being gutted in hopes of minimizing mold and contamination. Beyond that is the Queens war zone sans enemy; Broad Channel, Rockaway, Far Rockaway, Breezy Point… Top it off those areas can only be reached, coming or going, by car. Even if you have one, and less here do than don’t, gas is getting harder to come by… 

New Yorkers do not take kindly to being called victims. Let me let you in on a secret – no-one does! The title of “Victim” implies powerless, helpless, weak. Even when voiced by the best intentioned, it creates a sense of ‘us’ and ‘them’. “Victim” is an impediment. It gives the power to the helper. In the face of a task so daunting, we need to feel empowered. Call your neighbors neighbors. Call your friends friends. Heck – you can call a stranger a stranger who you can see needs a hand. Help is easier to give than to ask for. The word “Victim” can make it harder…

Right now, as I write this, there are a lot of people who need a hand. Many have never had to ask for help beyond their immediate family before. Few have ever faced a situation like they are facing now. Some are behaving poorly in the face of adversity. Most are behaving honorably. Even those like my family, who were effected minimally by the storm itself, are facing residual and unexpected challenges. We are all moving forward towards the new normal.

No one is quite sure what it is going to feel like - but we are sure that life hasn’t gotten back to it yet. Normal doesn’t feel so surreal.
 
Six Ways to Respond
 

Send a care package or an envelope with $20 in it to a random address at the edge of an impacted zone. Ask the addressee to use or deliver to a family in need. Trust that stranger to do what is right.

Support a small business or Etsy vendor in an effected area by ordering holiday gifts from them.

Foster a pet for a displaced family.

When people are tired, upset, lost, angry, cold, confused, etc, acknowledge that no-one is at their best when they feel that way and don’t take it personally.

When you are tired, upset, lost, angry, cold, confused, etc try not to take it out on others.

Send thank-you letters to first responders.


Thursday, September 27, 2012

Everything is Dangerous - Letter to a Home Town

Way Back in the 70's


Everything is Dangerous These Days

US Doctors Say Trampolines are a Danger toKidsUmmm ok. I have to wonder: Is there some new risk with trampolines that makes this newsworthy? Have strange trampolines started stalking our kids, following them home from school, offering them candy? Do doctors in Canada feel the same way? If more parents taught their kids the Five Little Monkeys song would fewer heads be bumped? Is anything considered safe these days?

Wow. I suddenly feel old. I am on the verge of one of those ‘Back in my day’ rants where the crazy old lady goes on about how when we were kids our parents let us roam like wild chickens, trusting that our pea sized brains would lead us back to roost at night. If I am not careful I will follow that up with a tale of how there was no crime and everyone was happy and fit and how it would still be that way if it wasn’t for the fact that Scooby Doo and those meddling kids quit going to church.

It is true that back my day I didn’t have a trampoline. I wasn’t allowed to jump on the beds either. (Strangely enough, I don’t remember being warned about hurting myself, just about breaking the bed.) When it came to finding means of potentially injury I was left to my own devices. I did things like tie a rope between two tree tops and try to scale across. I tested the thickness of ice by kicking through it. I was confident that bales of hay and stunt landing pads were interchangeable. I was a free range kid to the extreme and I survived for the most part unscathed. (As a parent I look back and wonder how).

Ideally our kids get the benefit of learning from our mistakes. In turn they get to make a whole new set of their own, thereby advancing into adulthood twice as mature and well adjusted as we did. (But wait… That would mean admitting to all that dumb stuff we did and they might tell our parents. Never mind.)

Left to their own device, the dumb stuff kids do has real world consequences, most of which are not a matter of life or death. Doing things and experiencing the consequences teaches how to navigate through fears and illustrates the difference between real and perceived risk. Fear has a lot of sway in the choices we make all through life, so this is a good skill to have.

Now my caveat: survival to spite youthful ignorance regarding the true danger of a given action is not good reason to let your own kids do the same dumb stuff. Kids, do not kick through ice to test its thickness. Trust me. Walking home in winter boots filled with water is no fun and I am glad I was close to the bank. Also, bales of hay are a close approximation to a stunt landing pad, but stuntmen have a lot of training (and an ambulance on site).

I hope that this letter has found you and yours in good spirits and good health. Until I write again…

Saturday, September 22, 2012

Apple Yogurt Whole Wheat Pancakes


Apple Yogurt Whole Wheat Pancakes
1c Vanilla or Apple or Maple or Plain Yogurt
1 Egg
2 Tablespoons Walnut Oil
2 Tablespoons Real Maple Syrup
Dash Cinnamon
1 t Baking Powder
1c Whole Wheat Flour
1 Large Apple Diced Up Small (Peal Optional)
A Bit of Butter for the Griddle
More Maple Syrup for Eating

Mix it all up in the order listed. Heat the griddle to medium, grease with a little butter then fry them up. Enjoy!

Notes:
If batter seems too thick, add a couple of Tablespoons of milk - If it seems too thin add a couple tablespoons more flour
Single serve yogurt is often a few ounces shy of a cup so you’ll need to add a couple Tablespoons of milk
The walnut oil adds a subtle nutty flavor but vegetable oil works just fine
These cook best at a slightly lower temp than regular pancakes – too hot and the batter closest to the apple pieces won’t be fully cooked
Apple Butter is a nice topping for these - It is also less messy if you have anyone who believes that forks should be optional


A Joke Quackin' Duck - Toddler Art Project


A Joke Quackin' Duck

Age: 2 - 5 Years (younger ones need more supervision)

Time: 10 min (+ Prep)

Theme: Ducks!

Books: Duck Sock Hop by Jane Kohuth, The Duckling Gets a Cookie?! By Mo Willems

Materials:
Dark Yellow or Orange Construction Paper
Yellow copy paper
Feathers
Star or Dot Or Heart or Other Shaped Stickers for Eyes
Glue sticks
Adult get to use Scissors

Prep: To make the duck bills, trace and cut a 6” circle from the construction paper then fold and cut into quarters. To prepare the puppets, fold a sheet of copy paper in apx. thirds long way (2-3/4 x 11). If the kids are very young you will also want to do the next steps: glue the edge closed, then fold the strip into quarters like an ‘M’ by folding in half, then folding the edges even with that fold.

Activity: Each child gets plain sheet of paper already folded into an ‘M’, a duck bill, a feather, a glue stick and some stickers. Glue the feather, then the bill onto the puppet (allowing the bill to overlap the feather will keep it from falling off easily in play). Add stickers for eyes, nostrils, beauty marks, etc. Test out your puppet then quack a joke!

Notes/Tips: The folded paper creates a pocket for fingers to go inside. Using the basic M fold, you can create other creatures by using different colored paper and features. This can become a big kid project by demonstrating the technique, then letting them design their own creatures.
 

PS. My top model decided she wanted to be on the other side of the camera for this project. The results were blurry but she got me!

Saturday, September 15, 2012

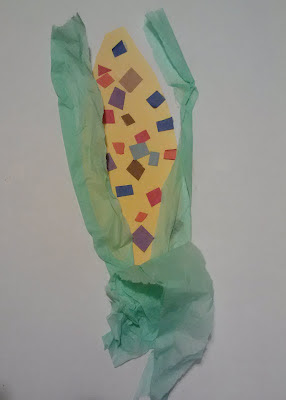
Mosaic Indian Corn – Toddler Art Project


Mosaic Indian Corn

Age: 18 Months - 5 Years (younger ones need more supervision)

Time: 10 min (+ Prep)

Theme: Fall, Vegetables

Books: Lunch by Denise Fleming and Market Day by Lois Ehlert

Materials:
Brown or Green Tissue Paper
Assorted Colors of Construction Paper (This is a great way to use up scraps)
Yellow Construction Paper
Copy Paper
Glue sticks
Adults (& some kids) get to use Scissors

Prep: Cut out cob shapes out of yellow construction paper. I folded the sheet in quarters (3 x 9) and freehand cut them. If children are too young to use scissors at all then also prepare assorted color ‘kernels’ (pieces 1/2” or smaller). If the kids are old enough to use scissors, have them prepare kernels themselves.

Activity: Each child gets plain sheet of paper to use as a background, a cob, an assortment of ‘kernels’ and some tissue paper to rip up for the husk. Using the glue stick, glue the cob to the background, then the kernels to the cob. Rip 2 or more strips of tissue paper and glue along the sides of the corn.

Notes/Tips: I found it useful to describe the process as preparing corn in reverse – starting with the cob, adding the kernels and then the husk. This is a good activity to go along with cutting time for little ones who are just starting to use scissors because it makes use of the scraps they make.

Thursday, September 13, 2012

Yogurt, Apple & Summer Squash Muffins


Yogurt, Apple & Summer Squash Muffins

Ingredients:
1 egg
1/4 cup coconut oil
1/2 cup sugar

¾ cup Vanilla yogurt (you can use any complementary flavor or plain too)
1 teaspoon baking powder
1/2 teaspoon baking soda

1 teaspoon ground cinnamon
3/4 cup all purpose flour

3/4 cup whole wheat flour
2 cups combined summer squash & apple shredded (I used a small yellow straight neck squash and a large Macintosh apple – you can use whatever variety of summer squash and apple you like)

Directions:
Preheat oven to 350 and prepare the muffin tins.
In a big bowl beat egg, sugar, oil, and yogurt. Fold in the summer squash and apple. Stir in the baking powder, baking soda, cinnamon then the flours.
Fill muffin cups about 2/3 of the way. Bake for about 20 minutes or until a toothpick comes out clean.

ENJOY!


Friday, September 7, 2012

Life as a 2 Year Old - Letter to a Home Town

This Letter was written about 6 months ago, but after a 40 minute stand-off regarding retrieval of some airborne art supplies earlier this week... It seems as timely as ever.


Life as a 2 Year Old

It is hard to believe, but the once Figlet about to turn two! Can it really be true?! It seems like just yesterday that I was thinking “What have I gotten myself into?!”  Now as soon as the house gets quiet I find myself wondering “What has she gotten herself into?!” Life before she came along was far from dull, but life with a 2 year old... I am being taken along on her ride through life in the impulse zone!  

To be 2 is to not be able to see even a few moments into the future. I am hungry and grumpy and you have served me food on the green plate. I wanted the blue plate and therefore this food must be emptied off the offending dinnerware. Where?! I don’t care! How about the floor! What do you mean there is no more? Can’t you see that I am hungry?

To be 2 is to always be moving on to the next best thing. Plink plunk on the piano keys. Belly flop on the beanbag chair. The baby doll needs shoes. Mom, help me put them on. I am going to chase the cat. Did you hear my 3 word sentence? I said “Cat knee ow!” Yes, I could use a mommy hug. Put me down now. I have to pee.

To be 2 is to have no modesty. Every day should be a no pants day! Why do you keep trying to put clothes on me?! My potty is in the kitchen, right where it should be. Every time I use it, you sing and dance for me! I follow you into the bathroom (when you will let me), and do a dance for you. Everyone should sing a happy song when they poo!

To be 2 is to discover what you want and how to say it. I like apples and oranges and I can ask for both by name. I like strawberries, but those I have to show you. I like cream of wheat. I call it ‘hot’ just like you do. When I say ‘chickies’ and bring you my shoes, you know that I want to go outside to play. When I say ‘Eee-eee ‘Orge’ I want to watch Curious Georges. I like him. He is a funny monkey like me. If you gave us typewriters we could write novels. Mine would be 5 words. His would be 3.

To be 2 is to take on life’s lessons – the ones that take a lifetime to learn. I am learning to share, learning to care, learning who I am and how to take care of me.  I am learning patience – with myself and others. I am learning that a smile keeps on going. I am learning that everyone is growing, or at least they could be, and they should be. I am also learning that if I ever want to find out what is in that drawer, I have to make just a little noise or you will wonder what I am getting into.

I hope that this letter has found you and yours in good spirits and good health. Until I write again…

Saturday, September 1, 2012

Chicka Chicka Boom Boom Alphabet Tree - Toddler Art Project


Alphabet Tree

Age: 18 Months - 5 Years (younger ones need more supervision)

Time: 10 - 15 min (+ Prep)

Theme: Alphabet

Books: Chicka Chicka Boom Boom by Bill Martin Jr. & John Archambault,  Alphabet City by Stephen Johnson, or just pick your favorite ABC book
 
Materials:
Green Construction Paper
Toilet Paper Tube(s)
Glue Sticks
Pre-printed Letters
Adults get to use Scissors and Computer/Printer

Prep: Cut out Tree leaves out of construction paper. Mine were cut freehand out of 1/6 sheets. (Fold the sheet into 1/3 then cutting along the fold lines to make 3” x 12” strips, then folded these in half to make 3” x 6”. Fold in half again and cut out leaves). To make letters, type out the alphabet (bold, 36pt), copy & paste until the sheet is full, then print & cut out. For the tree trunk, cut 4 slits about ½” deep into the top of the TP tube.                                                           

Activity: Each child gets 2 pre-cut leaves, an assortment of letters, a glue stick and a TP tube. Glue letters onto the leaves – and the trunk if you want too. Slide each leaf into two of the slits. Play with your tree!

Notes/Tips: Encourage older kids to put letters in order or spell out their name or other words with them. If you are up for the mess, paint the TP rolls first then while they are drying glue the letters to the leaves.


I first saw a version of this project here: http://www.2care2teach4kids.com/preschool/storyextenders/chickachickaboomboom.htm

Friday, August 31, 2012

No Pectin Ginger Nectarine Jam


No Pectin Ginger Nectarine Jam
Makes about 2 Pints (4 jam jars)

10 Medium Nectarines (about 2-1/2 lbs)
1 T Candied Ginger (minced)
1 T Fresh Ginger (peeled & grated)
1 T Dried Ginger
1-1/2 C Sugar
2 T Lemon Juice

Wash, pit and chop nectarines. How small depends on how chunky you like your jam: smaller = smoother. You can peel them if you want to, but that just seems like way more work than it is worth as the peels break down a lot while cooking.

Put all of the ingredients into a large wide saucepan or deep frying pan. Bring to a boil them lower to a simmer stirring regularly for about 20 minutes.

You can tell when it is done a few ways: It will be about 200 degrees on a candy thermometer, when you stir it will leave a ‘path’ behind the spoon for a moment, or you can just test it by taking a small spoonful out and popping it in the freezer for 30 seconds to cool.

Ladle into jars leaving about ¼ inch head space, wipe the rims, lid and process in a hot water bath. If you plan to eat it up in the next 6-8 weeks, you can skip the bath and just keep it in the fridge.  
 
Based on a recipe  originally found on www.foodandwine.com

Yummy on Honey Wheat Ritz!

Wednesday, August 29, 2012

What is Your Home Town's Claim to Fame?

From Bike The Byways

Everybody’s home town has a claim to fame. My home town, Gouverneur, NY is where the founder of the Life Savers Candy Company, E.J. Noble, was born. There is a giant roll of Pep-O-Mint Life Savers in the middle of town. This statue (along with the local museum’s two headed calf), is what has earned Gouverneur mention on the Roadside America web site.
This is not a paid promotion. I don't even get a free bumper sticker or anything. I have just found some cool stuff on the site. Roadside America is a guide to finding offbeat attractions, which in my mind are the best kind! You can find any number of small town museums, works made in homage to their originals (like Foamhenge in VA), and stuff that you have only seen in the movies (hint for Kevin Smith fans, head for NJ).  

From Earth Art By Brad
This brings me to the real reason for this post. When we were traveling a few weeks ago we stopped in a little town called Roscoe, NY. Along with claiming to be the fly fishing capital of the world, there were those photo props that you can put your head in all over the place.
 
Figlet & Her Daddy

 After taking a bunch of pictures I thought ‘This place ought to be listed on the Roadside America site’. So I sent them a tip, and now it is!
 
The End

Saturday, August 25, 2012

An Elephant You Can Play With - Toddler Art Project


An Elephant You Can Play With

Age: 18 Months - 5 Years (younger ones need more supervision)

Time: 10 min (+ Prep)

Theme: Elephants

Books: Seven Blind Mice by Ed Young, Listen to my Trumpet by Mo Willems (or choose your favorite Elephant & Piggie book)

Materials:
Construction Paper (heavier/higher quality works best)
Bendy Straws
Crayons
Adults get to use Scissors and Hole Punch

Prep: Choose different colors of construction paper for the head and body. For the body cut an H shape the size of ¼ of a sheet. For the head, cut a bow tie shape the size of 1/6 of a sheet. Punch two holes in the ‘bar’ of the H and one hole in the center of the head for the straw to feed through.

Activity: Each child gets a pre-cut elephant body, head and crayons. Decorate, draw, scribble! When done, have an adult help feed the long end of the straw through the holes in the head and body, leaving the ‘bendy’ as the trunk. PLAY!

Notes/Tips: Straws come in slightly different diameter, so make sure the ones you have fit snugly in the punched holes. If the straw is too narrow, cut a small ‘x’ with an exacto blade instead of punching holes. The easiest way to size the pieces is to fold the paper into quarters or sixths first. You can also cut multiples easier this way. This easily becomes a big kid project - just let them do the prep themselves.