Showing posts with label Library. Show all posts

Sunday, July 28, 2013

Magic Wands - Little Kid Art Project


Magic Wands

Age: 18 Months – 5+ Years (younger ones need more supervision)

Time: 10 min (+ Prep)

Theme: Magic

Books: The Magic Rabbit by Annette LeBlanc Cate, Extra Yarn by Mac Barnett

Materials:
Adhesive Backed Felt or Craft Foam
Yarn & String Scraps
Chopsticks
Adults get to use Scissors

Prep: Fold felt/foam and cut doubled shapes for wand tops (roughly 1”). Leave the folded edge intact (this way the pieces are more easily folded closed). Cut yarn and string into various lengths 4” – 12”

Activity: Each child gets a chopstick, a felt/foam shape and several pieces of yarn/string. Take the backing off of the felt/foam and place the top of the chopstick in the middle of the sticky side (littlest artists will need help with this). Choose what types of yarn and string your magic will travel on best. Add them to the sticky side too. When you have enough magic strands, close the wand top. Practice your magic. (Don’t forget to change everyone back to their original form before dinner!)

Notes/Tips: Kids who are learning scissor skills can practice on the yarn & string. String cuts best when held taunt, so this is also an opportunity for teamwork. In a group setting, magic wands can be used as ‘talking sticks’, indicating whose turn it is to speak. Foam stickers also work as wand tops.
 

Tuesday, June 18, 2013

Sand Paper Castles - Little Kid Art Project


Life has been quite busy lately so I haven't been posting projects as regularly as we have been making them. One project that we did were sand paper castles. The project was a great success so I made sure to snap a few pics. About a week later I saw this Kiwi Crate post... I guess great minds think alike.

Theme: Summer, The Beach, Sand Castles

Book Ideas: A Beach Tail by Karen Lynn Williams, Hamsters to the Rescue by Ellen Stoll Walsh, The Sand Castle Contest by Robert Munsch (older kids)

Materials:
Heavy Grit Sandpaper (1 sheet should be enough for 4 - 6 kids)
Background Picture (we found this stock pic) or plain paper works too
Glue Stick
Adults and Big Kids get to use Scissors

Prep: If using one, print picture to use as background. Cut sandpaper into simple geometric shapes in a variety of sizes no greater than 3". Be sure to create a few semi-circles for bridges and narrow rectangles for towers.

Activity: Each kid gets a background, a glue stick and several castle pieces. Design your own castle! Does it have a draw bridge? A moat? Towers with high spires? Maybe there is more than one on your beach. Let your inner architect play!

Notes/Tips: Bigger kids can cut their own pieces. This can easily be a scrapbook page project used along with photos from your own day at the beach.


Monday, June 3, 2013

Paper Pig Puppet - Little Kid Project


Paper Pig Puppet
 
Age: 18 Months - 5 Years (younger ones need more supervision)

Time: 10 min (+ Prep)

Theme: Pigs

Books: Pigs to the Rescue by John Himmelman, Happy Pig Day by Mo Willems
 
Materials:
Pink Construction Paper
Extra Small Paper Bag (beverage size)
Crayons
Glue Sticks
Adults get to use Scissors

Prep: From the pink paper cut 2 triangle ears and an oval for a snout. For the hooves cut 4 rectangles about 1” x 2” then add a small notch at the end of each. For the tail use a circle about 1-1/2” cut into a spiral.

Activity: Each child gets a small bag, 2 ears, 4 hooves, a snout and a tail and a glue stick for putting it all together. Once assembled, trade the glue stick for crayons. Add eyes, nostrils, spots, clothes, mud, anything you like. Then it is time for a pig party!

Notes/Tips: Older kids can practice their scissor skills by cutting the pig pieces out themselves. Beverage size paper bags are just the right size for little hands, but you can use lunch size bags too, just make the pig pieces bigger.
 

Thursday, January 31, 2013

Blast Off Rockets - Toddler Art Project


Blast Off Rockets

Age: 18 Months - 5 Years or older (younger ones need more supervision)

Time: 15 min (+ Prep)

Theme: Rockets, Space, Imaginative play

Books: On the Launch Pad: A Counting Book About Rockets by Nancy Atterbury, Not a Box by Antoinette Portis

Materials:
Card Stock Weight Paper
Colored Cellophane (We used red but any color will do)
Glue Sticks
Small pictures of faces (I found them in old magazines and used a 1” round punch to cut them out)
Adults get to use Scissors or Exacto Knife and a Ruler

Prep: Cut the four primary pieces of the rocket out of card stock. Our rockets consisted of a 3” x 5” rectangle for the body, the side ‘wings’ are a 3” x 4” rectangle cut into 2 triangles, and the point was half of a 4” square, but you can cut them to whatever scale you like. Cut 3-5 strips of colored cellophane to be the jet, and several faces (human or animal) to act as passengers.

Activity: Each child gets a set of pieces: 1 large rectangle, 1 large triangle, 2 smaller triangles and colored cellophane. Using a glue stick, assemble the rocket (adding the jet last so it doesn’t take off before they are ready). Choose some passengers and add them onto the body of the rocket. Time to Blast Off!
 

Notes/Tips: Putting the 'passengers' out on a large paper plate will help them from ending up everywhere. Choosing passengers after the rocket is assembled will also give the glue a few moments to dry before playing. If you don't have any colored cellophane, party streamers make a fine jet too. Don’t forget to talk about the shapes - its a preliminary math skill.
 
Working on cutting skills with the scraps.

Monday, December 3, 2012

The Pigeon Wants to be a Puppet - Toddler Art Project


The Pigeon Wants to be a Puppet

Age: 18 Months - 5 Years (younger ones need more supervision)

Time: 10 min (+ Prep)

Theme: Mo Willem’s Character Pigeon

Books: Don’t Let the Pigeon Driver the Bus, Pigeon Wants a Puppy, or any Mo Willem’s book starring Pigeon

Materials:
Construction Paper (Light blue, Orange, Black & White)
Craft (popsicle) sticks
Glue Sticks
Adults get to use Scissors

 Prep: Cut out Pigeon heads from the light blue paper, a nickel sized white circle and a dime sized black circle for the eye, a ‘W’ shape for the beak and a small rectangle for the collar (see picture). By folding a full sheet in quarters like an M you should be able to make 8 heads per sheet. Cut with the fold at the top.

Activity: Each child gets a craft stick, a head, eye pieces, beak, collar and a glue stick. To assemble, put glue all over the ‘inside’ of his head then fold over the stick. Glue on the big circle then the little one for the eye, then add the beak and the collar. Hide the hot dogs and the keys – you have your own pigeon!

Notes/Tips: Ask older kids what they think the pigeon should or should not be able to do and why. Encourage them to act it out with their Pigeon.
Having the pieces twofold so they wrap around the stick isn’t essential, but it makes them more durable for play.


Tuesday, November 20, 2012

Pizza Party - Toddler Art Project


Pizza Party – Toddler Art Project

Age: 18 Months - 5 Years (younger ones need more supervision)

Time: 10 min (+ Prep)

Theme: Pizza

Books: Pizza at Sally’s by Monica Wellington, Pete’s a Pizza by William Steig

Materials:
Brown Construction paper (heavy weight works best)
Assorted scraps and colors of construction paper & tissue paper
Yarn scraps, fabric scraps, foam bits, packing peanuts, sequins, buttons, etc
Small paper plates (optional - for ‘serving’)
Glue
Adults (& some kids) get to use Scissors

Prep: Cut pizza crusts from brown construction paper. I cut three triangular slices per sheet, but you can also make Sicilian style rectangles, or personal pan circles. Prepare toppings such as red and orange tissue scrap sauce, yarn cheese, green pepper paper slices, packing peanut sausage, etc.

Activity: Each child gets a ‘crust’, glue, a paper plate and an assortment of toppings. Make a custom slice! You can suggest that sauce and cheese be the first two toppings, but there is no wrong way to top a pizza. Serve paper pizza on paper plates.

Notes/Tips: You can use a hole punch to ‘pit’ black olive circles and onion rings shape themselves when card stock is cut in a thin spiral. When choosing toppings avoid potential choking hazards such as buttons for little ones. This activity can be made longer by making it a pizza shop game where children make and serve slices to order.

Saturday, September 22, 2012

A Joke Quackin' Duck - Toddler Art Project


A Joke Quackin' Duck

Age: 2 - 5 Years (younger ones need more supervision)

Time: 10 min (+ Prep)

Theme: Ducks!

Books: Duck Sock Hop by Jane Kohuth, The Duckling Gets a Cookie?! By Mo Willems

Materials:
Dark Yellow or Orange Construction Paper
Yellow copy paper
Feathers
Star or Dot Or Heart or Other Shaped Stickers for Eyes
Glue sticks
Adult get to use Scissors

Prep: To make the duck bills, trace and cut a 6” circle from the construction paper then fold and cut into quarters. To prepare the puppets, fold a sheet of copy paper in apx. thirds long way (2-3/4 x 11). If the kids are very young you will also want to do the next steps: glue the edge closed, then fold the strip into quarters like an ‘M’ by folding in half, then folding the edges even with that fold.

Activity: Each child gets plain sheet of paper already folded into an ‘M’, a duck bill, a feather, a glue stick and some stickers. Glue the feather, then the bill onto the puppet (allowing the bill to overlap the feather will keep it from falling off easily in play). Add stickers for eyes, nostrils, beauty marks, etc. Test out your puppet then quack a joke!

Notes/Tips: The folded paper creates a pocket for fingers to go inside. Using the basic M fold, you can create other creatures by using different colored paper and features. This can become a big kid project by demonstrating the technique, then letting them design their own creatures.
 

PS. My top model decided she wanted to be on the other side of the camera for this project. The results were blurry but she got me!

Saturday, September 15, 2012

Mosaic Indian Corn – Toddler Art Project


Mosaic Indian Corn

Age: 18 Months - 5 Years (younger ones need more supervision)

Time: 10 min (+ Prep)

Theme: Fall, Vegetables

Books: Lunch by Denise Fleming and Market Day by Lois Ehlert

Materials:
Brown or Green Tissue Paper
Assorted Colors of Construction Paper (This is a great way to use up scraps)
Yellow Construction Paper
Copy Paper
Glue sticks
Adults (& some kids) get to use Scissors

Prep: Cut out cob shapes out of yellow construction paper. I folded the sheet in quarters (3 x 9) and freehand cut them. If children are too young to use scissors at all then also prepare assorted color ‘kernels’ (pieces 1/2” or smaller). If the kids are old enough to use scissors, have them prepare kernels themselves.

Activity: Each child gets plain sheet of paper to use as a background, a cob, an assortment of ‘kernels’ and some tissue paper to rip up for the husk. Using the glue stick, glue the cob to the background, then the kernels to the cob. Rip 2 or more strips of tissue paper and glue along the sides of the corn.

Notes/Tips: I found it useful to describe the process as preparing corn in reverse – starting with the cob, adding the kernels and then the husk. This is a good activity to go along with cutting time for little ones who are just starting to use scissors because it makes use of the scraps they make.

Saturday, September 1, 2012

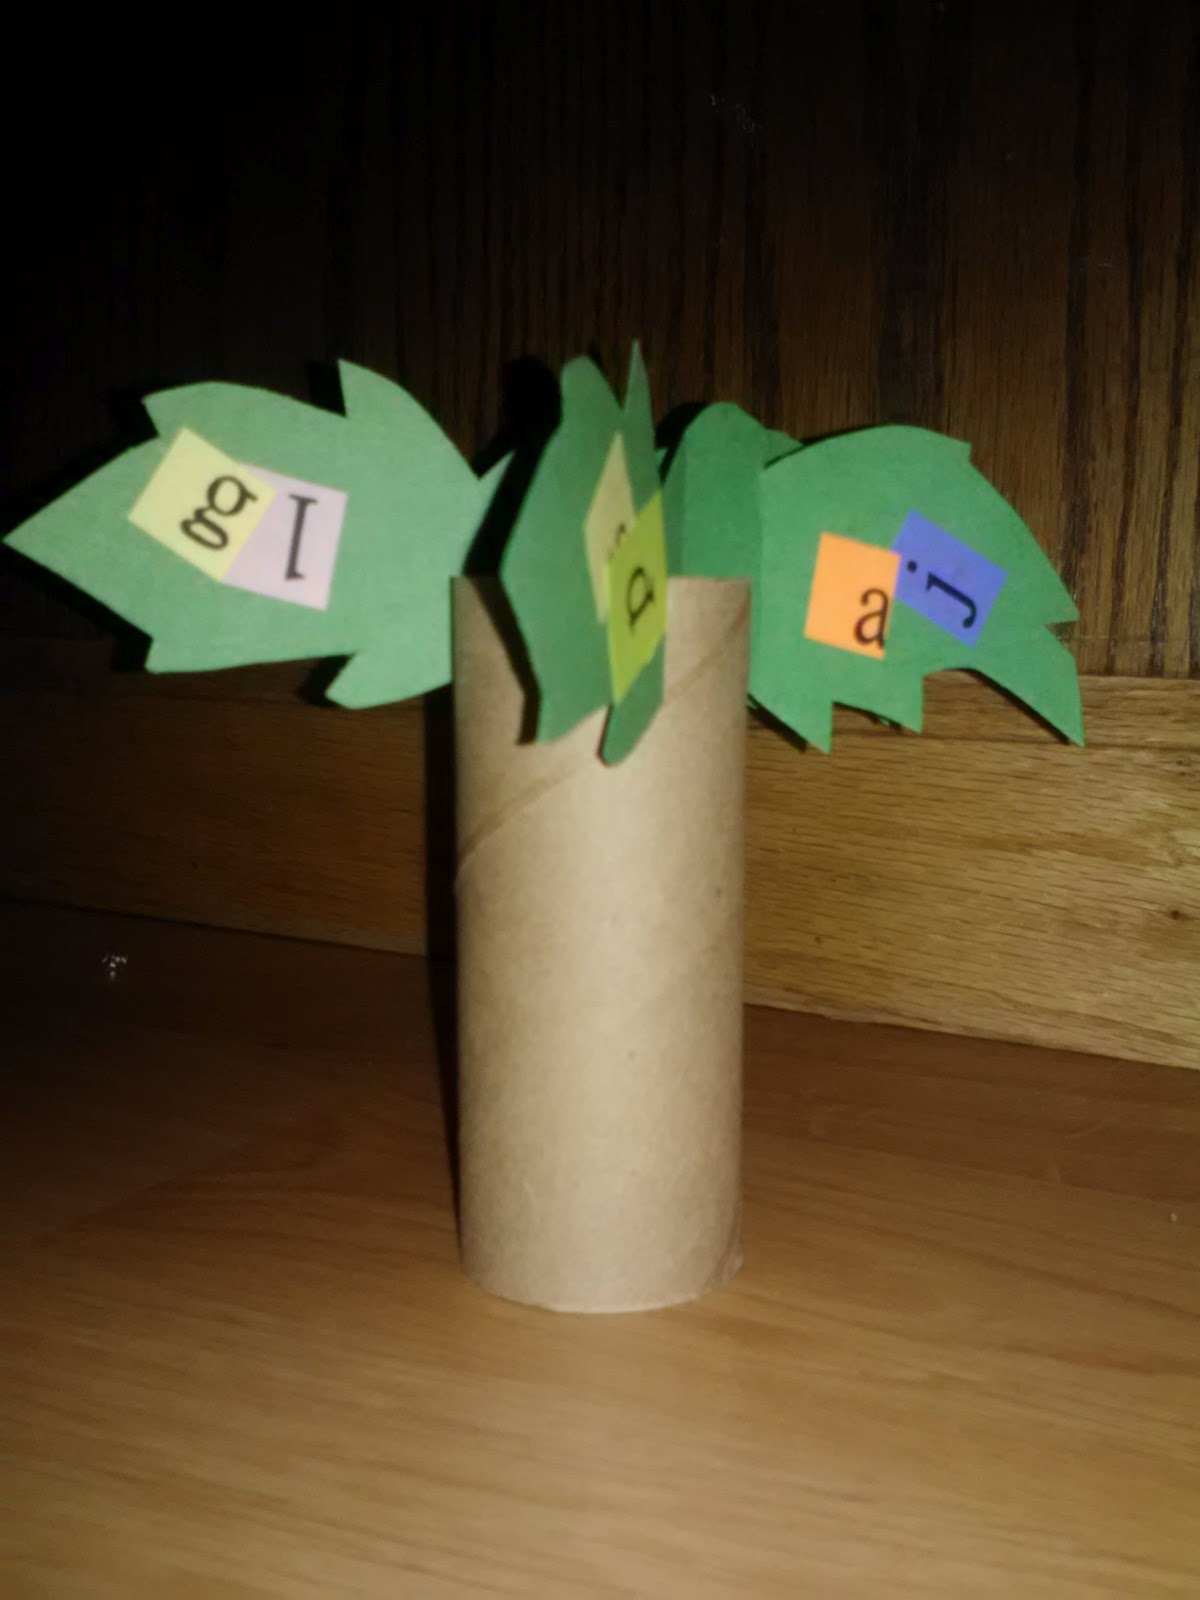
Chicka Chicka Boom Boom Alphabet Tree - Toddler Art Project


Alphabet Tree

Age: 18 Months - 5 Years (younger ones need more supervision)

Time: 10 - 15 min (+ Prep)

Theme: Alphabet

Books: Chicka Chicka Boom Boom by Bill Martin Jr. & John Archambault,  Alphabet City by Stephen Johnson, or just pick your favorite ABC book
 
Materials:
Green Construction Paper
Toilet Paper Tube(s)
Glue Sticks
Pre-printed Letters
Adults get to use Scissors and Computer/Printer

Prep: Cut out Tree leaves out of construction paper. Mine were cut freehand out of 1/6 sheets. (Fold the sheet into 1/3 then cutting along the fold lines to make 3” x 12” strips, then folded these in half to make 3” x 6”. Fold in half again and cut out leaves). To make letters, type out the alphabet (bold, 36pt), copy & paste until the sheet is full, then print & cut out. For the tree trunk, cut 4 slits about ½” deep into the top of the TP tube.                                                           

Activity: Each child gets 2 pre-cut leaves, an assortment of letters, a glue stick and a TP tube. Glue letters onto the leaves – and the trunk if you want too. Slide each leaf into two of the slits. Play with your tree!

Notes/Tips: Encourage older kids to put letters in order or spell out their name or other words with them. If you are up for the mess, paint the TP rolls first then while they are drying glue the letters to the leaves.


I first saw a version of this project here: http://www.2care2teach4kids.com/preschool/storyextenders/chickachickaboomboom.htm

Saturday, August 25, 2012

An Elephant You Can Play With - Toddler Art Project


An Elephant You Can Play With

Age: 18 Months - 5 Years (younger ones need more supervision)

Time: 10 min (+ Prep)

Theme: Elephants

Books: Seven Blind Mice by Ed Young, Listen to my Trumpet by Mo Willems (or choose your favorite Elephant & Piggie book)

Materials:
Construction Paper (heavier/higher quality works best)
Bendy Straws
Crayons
Adults get to use Scissors and Hole Punch

Prep: Choose different colors of construction paper for the head and body. For the body cut an H shape the size of ¼ of a sheet. For the head, cut a bow tie shape the size of 1/6 of a sheet. Punch two holes in the ‘bar’ of the H and one hole in the center of the head for the straw to feed through.

Activity: Each child gets a pre-cut elephant body, head and crayons. Decorate, draw, scribble! When done, have an adult help feed the long end of the straw through the holes in the head and body, leaving the ‘bendy’ as the trunk. PLAY!

Notes/Tips: Straws come in slightly different diameter, so make sure the ones you have fit snugly in the punched holes. If the straw is too narrow, cut a small ‘x’ with an exacto blade instead of punching holes. The easiest way to size the pieces is to fold the paper into quarters or sixths first. You can also cut multiples easier this way. This easily becomes a big kid project - just let them do the prep themselves.
 

Saturday, August 11, 2012

Make a Llama with Art Mama - Toddler Art Project

Story Time Llama

Make a Llama with Art Mama

Age: 18 Months - 5 Years (younger ones need more supervision)

Time: 10 min (+ Prep)

Theme: Llamas

Books: Llama Llama Misses Mama by Anna Dewdney, Is Your Mama a Llama by Deborah Guarino

Materials:
Card stock and printer
Yarn (the fuzzier the better)
Adults get to use Scissors & Hole Punch

Super Fuzzy Yarn!

Prep: Find a simple drawing of a llama. (I choose these by Kat Wong http://www.katdoodles.com/2012/02/l-is-for-llama.html) Instead of just printing out the page, copy the image and paste it into a word document. Adjust page orientation and the size of the image as desired. Print image onto cardstock paper. Cut out in rough outline, then punch holes within the body of the llama. Cut a length of yarn for each llama about 18” long.

Llama Full of Holes

 Activity: Each child gets a llama and a length of yarn. Thread the yarn through the holes every which way until your llama is sufficiently fuzzy. If you have extra yarn at the end, you can give your llama a scarf! Introduce your llama to your mama and your friends.

Llama in Progress

Notes/Tips: If little ones have difficulty putting the end of the yarn through the holes, demonstrate how to hold the yarn against the back of the hole so some of the ‘fuzz’ can be grasped and pull the yarn through. In Word, if you format the picture as ‘Behind Text’ it will allow you to move it freely around the page. Heavier paper makes a sturdier llama – but be aware of your printer capabilities.

Thursday, August 2, 2012

Let Your Little Lion Roar - Toddler Art Project


Let Your Little Lion Roar - Paper Plate Puppets


Age: 18 Months - 5 Years (younger ones need more supervision)

Time: 10 min (+ Prep)

Theme: Lions

Books: Do Lions Live on Lily Pads by Melanie Walsh, A Beach Tail by Karen Williams, Dandelion by Don Freeman

Materials:
Orange, Yellow & Red Tissue Paper
Red & Black Construction Paper (you can use scraps)
Small (desert size) paper plates
Glue sticks
Masking tape (if you are making them into hand puppets)
Adults get to use Scissors

Prep: Cut small triangle shapes from the construction paper to be used for eyes and noses. Rip tissue paper into workable size pieces. To make the handle, cut a ½” strip at the widest point of a second paper plate (exact length is not essential, so you can get 3 handles per plate).

Activity: Each child gets a plate, assorted tissue paper, eyes, nose & glue stick. Rip, crumple and twist bits of tissue paper, then glue them to the outer part of the plate for the loin’s mane. Don’t forget to glue on the eyes and nose. With some adult help, attach the handle to the back with masking tape. Give your lion a name then let everyone hear your best lion roar!

Notes/Tips: If you fold the handles in 1/3rds then fold the two ends in half again it will create a tab on each side that can be taped down easily (see pic in this post). Crayons can be used instead of construction paper to create the face. Challenge older kids to create a pattern in their lion's mane.

Friday, July 27, 2012

Happy Bunny, Sad Bunny, Totally Rad Bunny! - Toddler Art Project


Happy Bunny, Sad Bunny, Totally Rad Bunny!

Age: 18 Months - 5 Years (younger ones need more supervision)

Time: 15 min (+ Prep)

Theme: Rabbits, Expressing Emotions

Books: Not a Box by Antoinette Portis, Let’s Make Rabbits by Leo Lionni, What’s Your Sound Hound the Hound by Mo Willems

Materials:
Small (desert) paper plates
Craft sticks
Round Head Fasteners (they look like little nails but the bottom is two tongs that are bent flat)
Crayons
Adults get to use Scissors, Exacto Knife & Hole Punch

Prep: Cut in and around the center circle of the plate, leaving about 1” of the original circumference as a neck. Trim a slight concave arch on one side to create a nose. Using the edge of the plate that was removed, cut out 2 ears, each about 1/3 of the length of the remaining plate. Punch holes near the bottom of each ear and at the top of the head. Make 3 horizontal incisions in the ‘neck’ just long enough for the craft stick to weave through.

Activity: Each child gets a bunny head, 2 ears, and a round head fastener. With a little help (as needed) put an ear, the head and then the other ear onto the fastener. Color the bunny, giving one side a happy face and the other side a sad face. When done coloring, trade the crayons for a craft stick and carefully weave it into the slots, giving the rabbit handle like a puppet. Experiment with your bunny. How does she hold his ears when she is happy? How about when she is sad? Can you make her look surprised by changing the position of his ears? What about shy?

Notes/Tips: In preparation for this project, talk about how emotions are shown with the whole body. Act some out. Point out what emotions the characters in the books are feeling. How you can tell? For a big kid version challenge them to make a whole rabbit - with jointed limbs. Leo Lionni’s illustrations are a great visual guide!

Making her "Hop Hops" Tell a Story

Thursday, June 28, 2012

Stars, Stripes, & Coffee Filters - Toddler Art Project


Stars, Stripes & Coffee Filters

Age: 18 Months - 5 Years or older (younger ones need more supervision)

Time: 10 min (+ Prep)

Theme: Patriotism, 4th of July


Books: Hats Off for the Fourth of July by Harriet Ziefert, McDuff Saves the Day by Rosemary Wells, Apple Pie 4th of July by Janet Wong (for older kids)

Materials:
Red Construction Paper
Blue Party Streamers
Basket Style Coffee Filters
String/Ribbon/Yarn
Glue Sticks
Adults get to use Scissors

Prep: Cut stars from the red construction paper (if you make them about 2” - 1 sheet will yield 12 stars). Cut strips of blue steamer about 12”. Cut lengths of yarn 18” – 24”.

Activity: Each child gets 1 star, 1 coffee filter, 2 streamers and a piece of yarn. Glue the coffee filer onto the banner by putting glue all over the inside then folding it in half over the yarn. Do the same with the streamers. Then glue the red star onto the white. Have an adult help make loops at the ends for hanging.

Notes/Tips: You can make these as long or as short as you want by adding extra pieces (then challenge your tot to identify the pattern)! You can use blue stars and red streamers too. For an older kid version, have them draw on the filters with red and/or blue washable markers, then spray or drip water on them in advance. Just be sure to let them dry before it is time to assemble the banners.